The different components of scissor cutting
Cutting paper with a pair of scissors involves several different actions that need to be coordinated:
1 The preferred hand grasps the scissors and uses mostly thumb movements to open and close the blades. The fingers move at the finger joint closest to the palm (called the metacarpophalangeal joint) , while the other two joints are held steady and support the scissors.
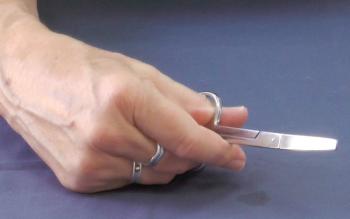

2 The hand that is holding the scissors (I will call it the cutting hand) needs to be positioned relative to the paper so that closing the blades cuts in the desired direction.
Children with good cutting skills will usually position the cutting hand so the blade is more or less at at a right angle to the body.
The blades need to be positioned at a right angle to the paper so that closing the blades makes a clean cut and stop the paper slipping between the blades). This happens when the blades tip towards the paper.
3 The other hand (called the supporting hand) holds the paper in place and at the same time changes the position of the paper relative to the scissor blades so as to change the direction of the line of cutting

4 The supporting hand also needs to change its position on the paper from time to time. To do this supporting hand must let go of the paper briefly, while the paper is supported by closing the scissor blades just enough to hold the paper while the hand is moved.

Sometimes the paper is supported by the cutting hand so that the supporting hand can be moved on the paper.

Graded cutting activities
These cutting activities are graded to allow the child to develop all these aspects of cutting paper, starting with cutting short straight lines and progressing to cutting out out shapes drawn of the page.
Providing the right environment - teaching tips
Height of the table
Let the child sit on a chair facing a table. The height of the chair and table top needs to adjusted so that it is about level with thee child's waist. This allows the child to easily position the hands in front of the body with the elbows flexed to about 900 and the arms held fairly close to the side of the chest.
If the table top reaches is too high, the child may hunch the shoulders, and move the arms sideways so that the elbows can rest lightly on the table top.
Give choices
Children work at tasks with more enthusiasm and attention when they have a sense of having some control over what they do. Providing the child with choices fosters this sense of control: let the child choose between different pairs of scissors, and different color paper for each activity.
Make time to practice
Learning and improving motor skills requires time on task, especially if a child has motor coordination difficulties. But young children will also not tolerate long training sessions - so keep your practice sessions short but regular.
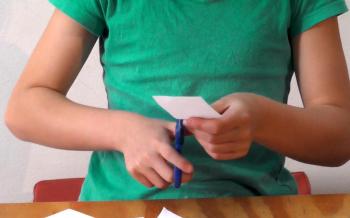
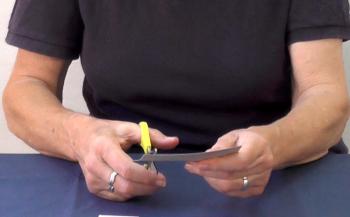
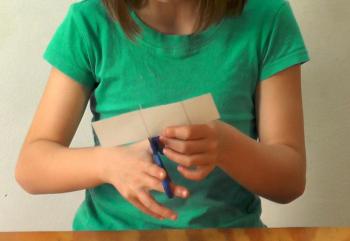
Cutting pieces off a narrow strip of thin card
In this activity the child cuts small pieces off a narrow strip of card. You can use the cut off bits of card to make a collage, using small balls of adhesive putty or glue to stick them down on the paper.
What the child learns in this activity
- To position the scissors and paper at right angles to each other, and ready to make the first cut.
- To cut along a line drawn on the paper
- To move the supporting hand on the paper.
You will need:
- a few strips of thin card, about 2 cm wide marked with vertical lines spaced 2cm apart.
- a pair of scissors


Demonstrate the cutting task
Demonstrate how you hold the paper with the supporting hand, and then cut across each line. The cut should be far enough so that the end piece drops off.
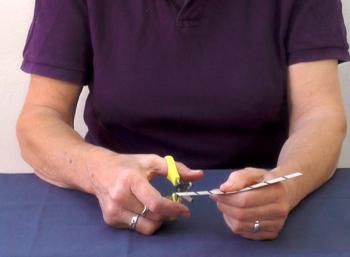
After cutting along several lines, you will need to move your supporting hand. To do this, hold the paper with the scissor hand, and move the supporting hand further along the strip of paper.

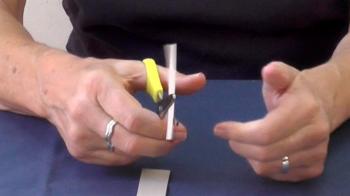
In this video clip you can see how I position and move my hands when cutting short and long lines across a piece of card. Because the card is quite stiff, the strips that are being cut off tend to get in the way. This is a good demonstration of how the thickness and stiffness of the paper can make the cutting task more or less difficult.
Let the child perform the task and observe
1 Let the child select the scissors he wants to use, as well as which colored strip he wishes to cut into pieces.
2 Can he open and close the scissor blades easily? Some children, and in particular those with hypermobile thumb and finger joints find opening and closing the scissors hard work You may want to just practice opening and closing the scissors. You hold the paper and let the child do the cutting.
3 Does he hold the paper with his thumb on top and the fingers on the bottom side? If he holds the card with the palm facing down, it is best to show him how the correct the position. The instruction is "Hold the paper so that you can see your thumb".

4 Does he hold the paper and scissors more or less at right angles to each other to produce a clean cut? This is a matter of experience and practice. It helps to have a pair of scissors with blades that are fairly sharp and are not loose so that they "wobble" slightly.
Let him cut up several strips of card to give him an opportunity to fathom out how to coordinate the actions of the two hands. Encourage him to cut close to the lines, but it does not have to be right on the drawn line.
5 Does he move his supporting hand along the card as is needed? It may be helpful to prompt him to move his hand. You can also suggest that he move the hand every 2-3 cuts.
Teaching tips
Once you have practiced cutting off pieces of card along lines drawn on the strips, allow the child to do some free hand cutting, choosing the color and size of paper he would like to use.
Use the pieces of card that have been cut off to make a collage.
Cutting off a longer strip
In this activity the child cuts a piece of thin card (A6 size) into pieces.
You will need
- Several pieces of card: make these by cutting an A4 sheet of thin card into 4 pieces (A6 size).
- Scissors
- Marker
Draw several lines across the width of the pieces of card. Use a bold color and thick marker to make it easier the see and stay close to the drawn lines.

Take a look at how you do the task
1 How you support the paper using the supporting hand?
2 To cut along the line, your cutting hand makes a cut, and then moves forwards a little before making the next cut.
3 Notice that you hold the paper more or less in the midline, your arms are fairly close to your sides and that the hands face each other. This makes it easy to cut straight forwards along the line.
Let the child perform the task and observe
1 Does he hold the piece of card with the thumb on top, more or less in line with the body midline?

2 Does the child hold the upper arm fairly close to the body (depending on the height of the table)? Or does the child hold the paper quite high with the arms lifted away from the body?
3 Does the child hold the card steady, with the scissor hand moving forwards along the line?
Here you see a young child cutting a horizontal line, He holds the arm of the support hand close to the body, with the arm of the cutting hand lifted away from the body. The shoulder movement is used to align the scissor blade with the cutting line. The cutting hand moves forwards along the line. This is in fact a good option for cutting a line horizontally across a piece of paper.
However, turning the paper so the the cutting line is vertical, is a better option and allows better control of the movement of the scissors along the cutting line. Here you see how Rona first holds the paper upright to position the line in line with the scissor blades. To cut the cut off strip into pieces, she turns it sideways so as to align the cutting line vertically.

This video clip shows how Rona positions the paper quickly to provide the best alignment for cutting along a line across a small sheet of paper. This ability comes after many hours of cutting practice, starting at age 3 years.
The coordination of shoulder, forearm and wrist movements develops with practice as does a knowledge of how best to position the paper for ease of cutting.
The ability to hold the upper arm steady and move the paper and scissors using fairly small movements of the wrist comes with increasing levels of coordination for cutting.
If you find that the child has not yet developed this coordination, it is a good idea to provide lots of practice cutting straight lines across pieces of thin card to allow the coordination to develop.
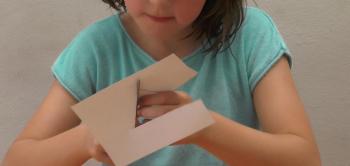
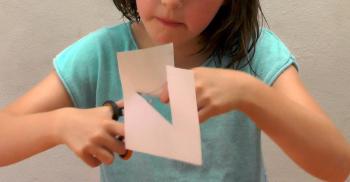
Cutting angled lines across pieces of card
In this activity the child cuts along lines that are drawn at an angle across pieces of card. To do this the card needs to be grasped in such a way that the cutting line is in line with the blade of the scissors.
Older children with good cutting abilities will position the paper so that the cutting line faces upwards or away from the body.

Younger children tend to use a combination of shoulder movements and wrist movements of both the supporting and scissor hand. The child also fails to hold the paper at an angle to position the cutting line in a more favorable direction.

Over time and with practice the child's ability to keep the arms relatively still, and position the paper with the cutting line pointing in a direction away from the body.
You will need
Several small pieces of thin card - make these by cutting a sheet an A4 card into 4 equal sized pieces. (A6 size)
Draw several diagonal lines across each piece of paper, as illustrated.

Let the child do the task and observe
Let the child cut the pieces of card into several pieces by cutting along the marked lines.
This is a tricky task for younger children, and they may revert to using movements of the shoulder to align the scissors with the cutting line. The best way to improve the control of the movements is to allow lots of practice.
Create a collage
Let the child also draw straight lines across several pieces of card. Use the cut off pieces of card to create a collage.
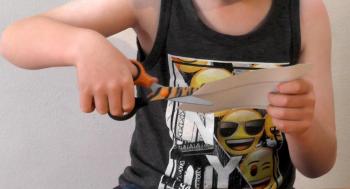
Cutting along lines that change direction - cutting out rectangles and triangles.
Once a child has learned to cut along straight lines, it is time to practice cutting along lines that change direction and go around corners. Cutting out a rectangles and triangles provides good practice for doing this.
You will need
Pieces of light card (A6 size is good) each with a rectangle or triangle of different sizes drawn on it.
Let your child cut out the shapes and observe
Children will generally figure out the best way to reposition the paper after cutting out each side of the shape, so that the line cutting line is at right angles to the scissor blade.
Teaching tips
For older children (6y ear plus) it may be useful to suggest that they reposition the paper when making a sharp turn. It may also help if you demonstrate how you reposition your and and align the paper with the scissors.
You may find that the child tries your way, and then reverts to his own method. Do not interfere too much, and allow him to explore different ways of doing the task.
In this video clip you see Will cutting out a Xmas tree using a zig-zag pattern. He is doing this free-hand ie without following a drawn shape. Notice how he reverts to using shoulder movements for manipulating the paper to change the direction of the cutting line.
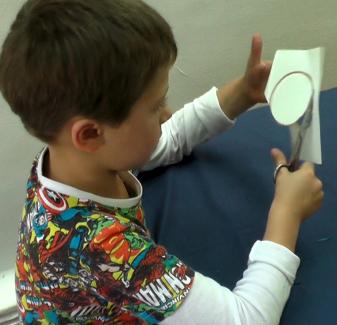
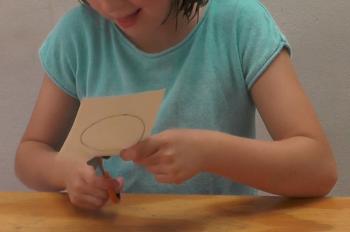
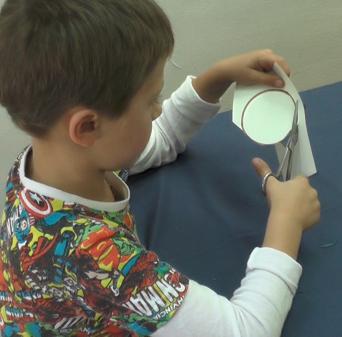
Cutting out a circle
Cutting out a circle neatly creates a new challenge for the child, because the relationship of the paper and scissor blade needs to change after each or every second snip, to keep the blade in line with the changing curve of the circle. To achieve this the position of the paper needs to be adjusted after each snip and after a few snips the supporting hand needs to be repositioned on the paper.
Cutting out a circle is best done moving in an anticlockwise clockwise direction.

In this video clip you see Will cutting out a circle, moving in a clockwise direction. This is awkward and the holding and positioning the paper gets tricky. I suggest to him that it is better to cut in the other direction, which he does easily. This is a good example of how a small suggestion can shift a child towards using a more effective motor pattern.
Let your child practice cutting out circles
Provide your child with several pieces of light card (A6 is a good size) with circles drawn on them with a thick marker, as big as will fit on the sheet pf card.
Encourage your child to cut along the line as neatly as possible.
If your child starts cutting in a clockwise direction, suggest that he changes direction. You can draw a few arrows on the line to indicate the direction.
Teaching tips
If your child has been practicing cutting out straight lines and shapes with straight lines, he should have developed fairly good ability to support the paper and reposition the hand on the paper. Hopefully, he will also be developing better coordination between shoulder, forearm and wrist movements with the shoulder doing less of the work, and the wrist making the small adjustments to reposition the paper and scissors.
What next?
The next step is to tackle more complex shapes that combine straight and curved lines. Children also need to learn to cut out shapes from A4 sheets of regular paper, which provides it own challenges.
Once your child has developed the basic cutting skills, you can look out for craft projects that include cutting out shapes. Look around o the internet to find inspiration.
My grandchildren love cutting out "paper snowflakes and paper doll chains and making paper plate masks.
Remember that practice is important and so is motivation. So you may need to explore different project to find the ones that catch the child's imagination and keeps him working at the task.